
| _ Photo CD Home | Basics | Advanced | Software | Make Your Own | Links | email me! |
|
| Kodak Photo CD
|
There are an incredible number of image viewing/editing programs in the world, and many of them support loading Photo CD images. For me to test them all, I would need a PC and a Mac with hard disks I could fill up, and a ton of time. This is not likely to happen any time soon. So, I decided I should publish the steps involved in doing my experiments so others could donate their time to test their favorite imaging software.
Depending on the software you are testing, some of these steps may not apply. As an example, only a limited number of software packages support editing in a color space other than the monitor's. So setting up your color space may or may not be possible.
If your software supports editing in different color spaces, set it up for sRGB. As long as the software doesn't do any color space conversions, this step is probably not necessary.
Obviously, you also need the Photo CD files used in each of the experiments. Here are links to each original PCD image for downloading:
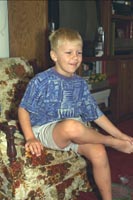
This image is used to test the highlight compression LUT used when loading a Photo CD image. Here's what we will do:
Load the image - If your software asks for source/destination color profiles, select "Color Negative" for the source, and "sRGB" for the destination. Select a resolution of 512x768 when loading.
Resize the image - Resize to 320x480. This is the size I use for all my versions of BlownJohn.PCD that you see on my web page.
Save as JPEG - Every image editing application I've ever used has a different way of specifying JPEG compression level. Photoshop has numbers from 1 through 12. ThumbsPlus has a percentage. Go for whatever gives you a file around 40k in size.
Send it to me - Email it to me and include the title/version of the software you did this with. I will then analyze it and potentially include it on the web page. The software will be listed in my software list, and your name will be credited as doing the experiment.

This is Kodak's grayscale wedge that I use to analyze the highlight compression LUT. This gives me a more precise way of figuring out which LUT is being used and how bad it is. Here are the steps:
Load the image - Just like the last experiment, load the image at 512x768 (768x512?). If your software asks for a source/destination profile, choose "Color Negative" for the source and "sRGB" for the destination.
Convert to grayscale - This step is to save space and time. My analysis is only interested in the brightness, not the color. Each application has a different way of converting to grayscale. You'll have to figure this out on your own. Worst case, skip this step, but be prepared to send me a really big file.
Save as TIFF - No JPEGs here. I need the precise numbers, and JPEG will mess them up. So save as TIFF, and use LZW compression if you can to make the file smaller.
Send it to me - Email it to me and include the title/version of the software you did this with. I will then analyze it and potentially include the curve I get in my curve graph on my web page. You will be credited for doing this for me, as usual. If you skipped the grayscale step above, you might want to consider sending the file to me through driveway.com. It will have a better chance of making it through my email system. If in doubt, email me to tell me how big it is, and I'll let you know what to do.
This experiment only applies to those who can select a source/destination profile when loading Photo CD images. If you are running Photoshop on a Mac, I need you to do this for me. This is one area where I'm lacking data. Here's the outline:
- Load the image with:
  - Resolution: 512x768
  - Source Profile: Universal K-14 (pcdkoycc.icm)
  - Destination Profile: sRGB
- Resize to 300x200, save as JPEG Quality Level 6.
  Use a filename like ImpatiensK14.jpg.

- Load the image with:
  - Resolution: 512x768
  - Source Profile: Color Negative (pcdcnycc.icm)
      This is the only thing different from last time
  - Destination Profile: sRGB
- Resize to 300x200, save as JPEG Quality Level 6.
  Be sure to use a different filename.  ImpatiensNeg.jpg would be good.
<- Back to my PhotoCD page.
Disclaimers: These are simply the experiments I've done while testing Kodak's Photo CD product. I am not affiliated with any of the companies mentioned in this page in any way other than as a customer. All trademarks are owned by their respective owners. There are no ads on this page, and there never will be. Use this information at your own risk. I won't be held responsible for anything that happens to you as a result of reading this. Shake well before serving. The contents of this page are Copyright 2000, with all rights reserved by me, Ted Felix.