
| _ Photo CD Home | Basics | Advanced | Software | Make Your Own | Links | email me! |
|
| Kodak Photo CD and
|
Since I'm not too familiar with shooting transparency film, I decided to experiment, and analyze the results of having transparencies scanned to Kodak Photo CD. My goal was to learn what constitutes a "properly exposed" transparency as far as Photo CD is concerned. I also evaluated the transparencies by eye to see if Photo CD and my eye agree.
Everybody shoots flowers it seems. This was a rough proof of concept to iron out the details of doing this experiment. I didn't write down the exposure values or gray card measurements. The slide mask is not cropped out, so you'll see a big spike in the black.
Note that I've organized the histograms so they are close together and stacked vertically. This lets you compare them more easily. The images that go with those histograms are arranged horizontally above them.
 #1 |  #2 |
| #1 | 
| Black: 0 White: 185 White Max: 207 |
| #2 | 
| Black: 0 White: 210 White Max: 235 |
Notice that the histogram seems to bunch up toward the white end as the exposure increases. This leads me to believe there is a wall past which the white data cannot go in a Photo CD scan, and that wall is not at 255. Interestingly, this sounds like it might be the reason for the Lost Highlights problem. Maybe the Lost Highlights problem isn't as bad with transparency film as it is with color negative film.
This shot done with full sun to the left of the subject, and no reflector to the right. Shutter 1/125, ASA 100.
One set of images is the raw TIFF file converted to JPEG. The second set has the white point set to the right edge of the last bump in the histogram. After this example, I'll adjust the white point in all future images.
| Gray Card Max | f/13 |
| Gray Card Left | f/13 |
| Gray Card Right | f/4.8 |
| Gray Card at face | f/6.7 |
| Best Slide | f/6.7 & f/8 |
| Best Scan | f/6.7? |
| Raw | 
| 
| 
|
| White Point Adjusted | 
| 
| 
|
| f/8 | f/6.7 | f/5.6 |
| f/8 | 
| Black: 0 White: 208 White Max: 249 |
| f/6.7 | 
| Black: 0 White: 192 White Max: 219 |
| f/5.6 | 
| Black: 0 White: 194 White Max: 224 |
An image with key/fill (left/right) light difference of 3 stops is really pushing the limits of Photo CD with this particular subject. If you must push the film this hard, you'll have to choose whether the shadows or highlights are important to you. A better approach would be to use the sun as a backlight, and flash for the front of the subject if you can swing it.
This shot was done in the shade of a tree and a house. White point has been adjusted in the JPEG version of the images. Shutter speed 1/60, ASA 100.
| Gray Card Max | f/5.6 |
| Gray Card at face | f/4 |
| Best Slide | f/4 |
| Best Scan | f/3.2 |
 f/4 |  f/3.2 |  f/2.8 |
| f/4 | 
| Black: 0 White: 196 White Max: 224 |
| f/3.2 | 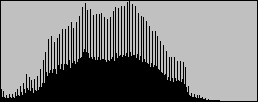
| Black: 0 White: 208 White Max: 219 |
| f/2.8 | 
| Black: 15 White: 186 White Max: 202 |
I thought the f/4 slide looked best, and that matched up with the gray card reading at the face. Photo CD seems to want 1/2 stop more exposure, though. The f/3.2 slide was slightly out of focus which might have biased my evaluation.
Photo CD and my eye are pretty close to agreement. In fact, Photo CD seems to want a little bit extra exposure than my eye does.
With E-6 transparency film scans, the Lost Highlights Problem is pretty bad, but it isn't as severe as it can be with negative film. Photoshop's highlight compression curve is linear up to about 160. These images tended to have most of their highlight info starting around 190. So there would certainly be some lost information in the images and a serious reduction in dynamic range.
For completeness, I should try a roll of Kodachrome.
Proper exposure is in the eye of the beholder. For a high contrast image, varying the exposure will change the amount of highlight and shadow detail you get. What is best is a matter of personal preference and what you are trying to say with your image.
Shooting transparency film is the best way to debug your method of determining exposure. Practice with it often. Take lots of notes. Use your gray card.
I had a horrible bug in my method for determining exposure. I wasn't holding the gray card oriented like the subject. This explains a number of horribly underexposed rolls of film. Going for the brightest gray card reading you can get is not the proper technique. I should have read the instructions that come with the gray card a little more carefully. Although they suggest turning the card slightly toward the light source which would reduce the exposure slightly. I've found this to be unnecessary.
Get the whole roll scanned. It's cheaper in the long run.
These shots were done on Kodak Elitechrome 100. I used a gray card to estimate the proper exposure then bracketed to death. I then selected the slide I liked best on the light box, and had that slide and its two bracketed neighbors scanned (+/- 1/2 stop). I had the slides scanned by the Kodak Lab onto Photo CD. I then converted the PCD images at 1536x1024 resolution to TIFF using ThumbsPlus and my Photo CD Library Fix. After that I cropped away the slide mount, and did a Levels to get the histogram. Then I measured the white points. After all this I resized the image to something reasonable for web display and saved as JPG, quality level 6. For some of the examples, I also adjusted the white point to the right edge of the last bump in the histogram before resizing and saving as JPEG. To my eyes, this makes it easier to tell what's going on. There's not a whole lot of information beyond that white point.
Kodak's Scene Balancing Algorithm (SBA) is turned off when scanning slides with the Universal E-6 Film Term. So what we see here should be almost exactly what the scanner saw.
<- Back to my Photo CD page.Disclaimers: These are simply random observations I've made while using Kodak's PhotoCD product. I am not affiliated with any of the companies mentioned in this page in any way other than as a customer. All trademarks are owned by their respective owners. There are no ads on this page, and there never will be. Use this information at your own risk. Perform your own experiments before committing to PhotoCD for any purpose. I won't be held responsible for anything that happens to you as a result of reading this. Shake well before serving. The contents of this page are Copyright 2000, with all rights reserved by me, Ted Felix.
Copyright ©2000, Ted Felix