Ted's Photo Retouching Process
Introduction
I thought I'd detail the steps I go through when fixing
up photographs in Photoshop in the hope that it might help
others figure out how to use Photoshop. Also, if I
somehow forget all this, I'll know where to look.
Everything I do here should work with Photoshop 5.0 and
up.
Hopefully one day I'll get around to adding example images
and screen shots.
If this is all a bit overwhelming, you might want to start
with my
Introduction to Photoshop.
It lays the groundwork for what you'll read about here.
Goal
Before you can retouch anything at all, you have to have
a goal in mind. For me, the goal was to fix up images so
they would be good enough to print 4x6's and display full
screen on a computer monitor. I decided on a resolution
of 800 pixels for the widest side. Printed to a 4x6 this
gives 150dpi worth of resolution. On a typical computer
monitor, 800 pixels is usually plenty for a full screen image.
These images would be archived to CD and possibly
shared with friends/family on the CD. I decided to use
the JPEG format and played with Photoshop 5.5's JPEG
settings and found Quality 6 to be a good compromise between
file size and image quality. I also decided to include
title cards as 800x600 GIF files that contained descriptive
text interspersed throughout the collection.
Some sort of file naming convention was needed so I
finally settled on the convention used by Fuji's EXIF Viewer.
YYYY_MMDD_HHMMxx.jpg, where "xx" is a two letter code
to prevent name clashes. I got lucky with the sorting
of the GIF title cards because "GIF" comes before "JPG"
in alphabetical order. So title cards with the same
name as a JPG file appear before the associated image
when sorted by name. I use my own
ExifRen utility
to rename my digicam JPEG files
automatically.
Retouching
With a goal in mind, we can now start working on the images.
Stock Color Correction
If the photograph was taken under a known set of circumstances,
like in my basement hallway with my Sunpak 383s flash, I will first
lay in a stock color correction adjustment layer. This will get
me good neutrals to start with. Even if it wasn't shot in the
hallway, but it was shot with the Sunpak 383s, this adjustment
layer may still help.
I usually make this stock adjustment layer by shooting
a white card in the environment, then making a Levels layer
that neutralizes the white. Make sure you neutralize the white
using only the output sliders. Using the input sliders will result
in a loss of data. Once you have the levels the way they should
be, you can either save the settings, or make an action with
those settings. Either way, you can then automatically color
correct for that situation any time you need to.
For best quality, when you begin a shoot, you should shoot
several frames of a white card under the lighting you plan
to use. This gives you a great white reference to start with.
Make a color correction layer for the shoot from these
white card shots.
Noise Reduction
This is also a good time to consider using some sort of
noise reduction on the image. Anti-aliasing color works best
at the full resolution of the image. See my
anti-aliasing
color tutorial for more.
Rotating/Cropping
Images that are obviously slightly tilted, or with
poor composition can be rotated and cropped to suit. Sometimes it's
a good idea to put this step off until after color correction
since you may crop off a good white reference.
A common problem that can be corrected prior to Rotating/Cropping
is convergence due to a wide angle lens and the camera
not being level. No need for the rising front adjustment
on your view camera, just use Photoshop's "Perspective"
Transform to fix up convergence problems.
- Select All (Ctrl-A)
- Edit | Transform | Perspective
- Grab a top corner or bottom corner and pull in or out until
the image looks right.
Spotting
 The Rubber Stamp tool is an indispensible spot remover.
Combined with a pressure sensitive graphics tablet, it
is a joy to remove spots from images. Typically spots
happen in film scans from dust in the scanner.
Color negative film will have white spots, while transparency
(slide) film will have black spots. Digital cameras aren't
immune to spots. The CCD in a digicam might have bad pixels
that show up as spots, more commonly in long exposures and
dark areas of the image.
The Rubber Stamp tool is an indispensible spot remover.
Combined with a pressure sensitive graphics tablet, it
is a joy to remove spots from images. Typically spots
happen in film scans from dust in the scanner.
Color negative film will have white spots, while transparency
(slide) film will have black spots. Digital cameras aren't
immune to spots. The CCD in a digicam might have bad pixels
that show up as spots, more commonly in long exposures and
dark areas of the image.
Removing Red-Eye
My favorite red-eye removal technique requires three steps.
First, create a Hue/Saturation adjustment layer with the Saturation set to
0, and mask it out (fill with black). Then with the paint brush
(preferably a soft-edge brush) and the color white,
mask in the layer in the area where the
red-eye is. This turns the red-eye into "grey-eye". Next,
load this layer mask as a selection (Select | Load Selection...).
Now create a new Levels adjustment layer and adjust the input
black point up until the grey-eye is gone.
For most red-eye, this technique will suffice. In extreme
cases, more artistry is required. I usually try to avoid these
extreme cases.
Resizing
Resizing should be done after Cropping/Rotating, Spotting,
and Removing Red-Eye. Spotting and Removing Red-Eye
are easier with a full resolution image since they require
fine detailed work. Cropping/Rotating will change the size
of the image, so the resize step must come afterward.
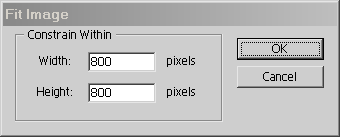
Photoshop's Fit Image (File | Automate | Fit Image...)
feature lets you quickly resize an image to a limit like
the one I set (800 pixels). I have this on a Function Key
so I can use it quickly when needed.
Levels (Color and Density Correction)
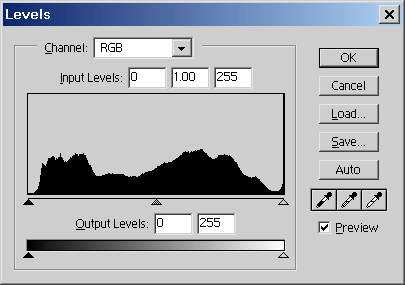
There are several tools for Color and Density Correction
but Levels provides a good balance of power and ease of use.
If your goal is quick retouching, Levels is definitely
the way to go. If your goal is perfection, Curves
would be a better choice.
Depending on where your images are coming from,
there are different approaches to using levels. In the
simplest case, images are already very close to being
correct color-wise. Images from Digital Cameras and scans of
transparency (slide) film fall into this category.
Usually a tweak to the black and white points is
all that is needed. Sometimes if the light source
doesn't match the digital camera or slide film's
color balance (e.g. a tungsten lit subject on
daylight balanced film) you'll need to do more work
to get things looking right.
In the case of scans of color negative films,
the Auto-Levels feature in Photoshop can be a real
lifesaver. It isn't perfect, but most of the time
it will get you real close to something useful.
For on-camera flash photographs (and others too)
I tend to set an RGB Gamma of 1.1 to reduce contrast,
and a Blue Gamma of .9 for added warmth. The warmth
is particularly helpful with skin tones which tend
to become very red under artificial light.
If the contrast is really out of control I've started
using a new trick. I call it "Lighten Shadows". By
loading the luminosity mask (Alt-Ctrl-~), inverting
it (Shift-Ctrl-I), then creating
a Levels layer, you can reduce contrast without
killing saturation like Gamma would. Adjust the
white point to brighten up the shadows only. This trick
has proved itself to be worth its weight in gold many
times. You'll have to balance this with a normal
Levels layer. By going back and forth you can get
almost any effect you want.
Hue/Saturation

I use Hue/Saturation
adjustment layers to handle a few common problems.
One of these is yellow grass. In photographs,
grass and foliage tend to be a bit on the yellow
side, particularly when lit by direct sunlight.
By adjusting the Saturation in the Green Channel
by +10 to +20 and adjusting the hue by +10 (+20 if
you like to live dangerously), you can get significantly
better greens. There's one more step, though. You
must shift the green range toward the yellow
in the color slider at the bottom of the Hue/Saturation
dialog. Otherwise the effect will be barely noticeable.
Another useful trick with Hue/Saturation is dealing
with on-camera flash and caucasian skin tones. We
already warmed the image up with a .9 Blue Gamma in
Levels, now a tweak to the Red Channel in Hue/Saturation
completes the effect. Shift the Hue of the Red Channel
by +4 (more or less to taste) and reduce the Saturation
by -5 (less to taste). For me, this is the difference
between skin tones in a professional portrait, and skin
tones in a typical drugstore print.
Blue skies can also benefit from some Hue/Saturation
tweaking. A Hue shift of +10 in the Cyan Channel will
darken a light blue sky. Cranking up the Saturation helps
too (+10 to +20).
Sharpen
Photoshop's Unsharp Mask filter does a great job
sharpening a soft image. It can't fix an image that
is out of focus, but it does add an extra sparkle
that makes an image come to life. This step should
always be done after resizing since its effect is
dependent on the size of the image.
Dodge/Burn (optional)
Although Photoshop does have dodge and burn tools,
I find them very hard to use. Instead, I add a Levels
Adjustment layer, and mask in shifts in white and black
points to darken or lighten areas. The big advantage
is that you can change these dodges and burns later
if you don't like them.
Blur Background (optional)
Digital Cameras tend to have small apertures, as
do most cameras when used with built-in flash.
With small apertures come large depth of field (DOF).
Everything is in focus.
Sometimes, it would be nice to have a more shallow
DOF with the background out of focus to reduce distraction.
In Photoshop, you can blur the background by creating
a duplicate layer of your image. Gaussian blur this layer
to taste, then mask it out. Carefully mask in only
the background (a Graphics Tablet is a huge help here).
When you are done, only the background will be blurred.
Soft Focus (optional)
The approach to achieveing a Soft-Focus effect is similar
to the background blur effect above. Create a duplicate
layer and blur it with Gaussian Blur. Mix it in with "Lighten"
mode and an opacity around 50%. You can also mask out certain
areas so they will be sharp while the rest of the image
is soft focussed. This works well on eyes and hair.
Note that using "Normal" mixing mode gives a heavier
"wetter" look to the soft focus. You'll need to back
off on the opacity (10-30%). This can be great for
softening up skin. Sort of a "digital makeup".
Actions
I use Actions and function keys to automate the above
sequence of tasks. My F2 key does the resize for me,
the F3 key runs an action that gives me a Levels
Adjustment Layer, a Hue/Saturation Adjustment Layer,
and Unsharp Mask. Finally my F4 key is set up to
Flatten Layers. I also have actions for other extra
processing like Soft Focus. Using Actions and function
keys speeds up retouching considerably.
Final Product
When is it done? That's up to you, of course. If
the pictures are just for the relatives, you don't have
to work too hard. But if your goal is an 8x10 or maybe even
a gallery image, you'll want to spend extra time in the
above steps.
<- Go Back to my Photography page.
Copyright ©2001, Ted Felix